Rules and Such...

- Challenges are posted every Wednesday
- You may combine this challenge with others
- You can use any products or stamps (you aren't restricted to just using Pixie Cottage, although we would love to see how you use our products too!)
- Post your creation on your blog with a direct link to this challenge
- Entries due by midnight (EST) on the Tuesday night before the next challenge
- Winners will be announced on Fridays!

Jan 30, 2010

Saturday Showcase of New Stamps

Hello, I hope everyone is enjoying your weekend!! Today we have some cards showcasing some of The Pixie Cottage's newest stamps.
I also wanted to let everyone know I have a special set of stamps coming in very soon.  I know there are a lot of cardmakers out there that only use A2 size cards and Sandra Hammer's lovely images of Hannah were too big for you. So I have put together a SET of Hannah images in a smaller size that will work perfectly for A2 cards.  You will be able to buy all seven Hannah images in the smaller size very soon!!

Here are the beautiful cards by the design team.

First, is Renata's lovely card with the new stamp Loves A Lot Lion coming soon by Eileen Gutierrez


Next, we have Katie's Card with Sandra Hammer's new April stamp which is available fo sale HERE


Tammy has used another new stamp (Fairy Molly) that is coming next week from Eileen Gutierrez.

and  Risa has used the adorable giraffe stamp "Ten Feet Tall" by Tricia Moore available HERE


Peggy has done this cute little card with ArTish's Qpid Stamp


 And look at Pam's take on QPid, another darling card!

Wonderful job ladies!!
Don't forget to enter our challenge you (red or pink) you have another week to get your entries in!  Also, we still have BLOG CANDY available, win one of our new stamps! (Candy ends February 5th)
Michelle

Jan 27, 2010

Challenge 8 -- Colors Pink and Red

Random Winner of the Gift Voucher from challenge #7 is Adrina


Please email me (Michelle) for your prize at casdanben@aol.com

Here are the top three from Challenge 7.
Gunilla
Yvonne
Kate

You can click on the winners names to see all their beautiful work on their blogs. Winners may copy the logo below to display on their blogs if they wish, and also are in the running for being a Guest Design Team Member.


The next challenge is a COLOR challenge!


Every other Wednesday we will host a challenge, and we want you to play! Prizes and fun and inspiration abound, and because you have a week and a half to get your entry in, there is plenty of time to find your creative magic... !

For our this challenge, we are asking you to...

Use the colors Red or Pink as your main color in honor of Valentine's Day! It doesn't have to be a Valentine card, but just use either of those colors as your main color.

You may combine this challenge with others- You can use any products or stamps (you aren't restricted to just using Pixie Cottage, although we would love to see how you use our products too!)- Post your creation on your blog with a direct link to the Pixie Cottage blog- Leave a comment with a link to your blog post with your entry (or use Mr. Linky if he is available)- Create a card, scrapbook page, altered box... no limit to your creativity!- Entries due by midnight (EST) Sunday, February 7th- Winners will be announced on Wednesday, February 10th, along with the next challenge!And what will you win? I'm so glad you asked! :) One entry, drawn at random, will win a fabulous 10.00 gift voucher from Michelle's Scrapbooking & More and their choice of a Pixie Cottage Stamp. We will also name a top three based on our favorite cards.


Here are the wonderful cards made by our design team.  You many notice some NEW Pixie Cottage Stamps!!

You may click on their names to be taken to their blogs to see more of their work.


So that is what we came up with, lets see what you can come up with!
Michelle

Jan 25, 2010

New Stamps Preview and Blog Candy!!!

Hello everyone in blog land. I hope you all enjoyed your weekend. I did!
I have a new batch of Pixie stamps coming in soon and I wanted to show you some of them.  This bunch is by Eileen Gutierrez.
They are so sweet  I cannot pick my favorite, can you? I will be putting them up for sale this week, and I hope to have them by early next week.  I think these are versatile enough that they can be used for more than just Valentine Day stamps.
 Which one is your favorite?  Leave your comment with a link to your blog.  Tell us on your blog which is your favorite stamp along with this picture and link back to this blog.  Don't forget to sign up to follow this blog, so that you can see all the new releases and winners of challenges and candy! February 5th I will choose THREE winners!! And they will receive the stamp they mentioned in their blog post as their favorite.


Thanks so much for playing, Michelle

Jan 23, 2010

Time for Another Tutorial

Hello Everyone!
It's time for another Saturday tutorial and this time it comes from very talented Design Team member Risa of Life's Simple Pleasures.
I'm sure you'll enjoy it and I can't wait to try it myself.
I'll hand you over to Risa and her little lesson.

Hello Everyone,
Today I would like to share with you a tutorial on how to make cute gifts out of materials that would normally go to the recycle bin. I think it is great when you can save a few pennies and I hope that after viewing my picture tutorial, you will feel the same way as I do!

Materials needed..... any container of choice, design paper, ruler, marker, circular punches, double sided tape. Optional items are ribbon and border punch. (The sky is the limit here and you can basically use what ever you want to embellish)


Paper measurements were 6" by 8 3/4"
I am beginning my tutorial with an empty Crystal Light container. I feel that it is easier to have some sort of guide to insure that your design paper wraps evenly and this is why I used a ruler and marker at this point. I found the almost invisible seam from the peeled off label and with my ruler, I drew a line on my container.


Now, carefully line up your design paper against the drawn in line and peel off sections of the double sided tape as you are wrapping the design paper around your container.


I'm almost finished with my project and off to the fun part....deciding how to embellish!!! I could have left my project on the plain side but I decided to add some decorated trim.

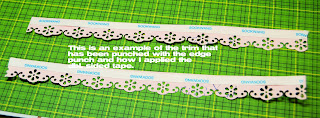
I started with two pieces of cardstock and the measurements were 1" X 8"
I then used my edge punch and created the fancy trim.

To keep a uniform look, apply your decorated trim at the seam of your design paper and carefully peel off the double sided tape as you proceed to wrap.

Now it is time to decorate the lid of the container. Because of the small size of the lid, my Marvey U. circle and circle scallop punch were a perfect match.

To secure my ribbon, added two mini glue dots to the scalloped piece of cardstock

and then I applied some glue

to the circular piece of design paper. Because my lid has a slight depression, I added some pop dots to give my scalloped piece some height.

After adhering the scalloped piece to the lid, I simply made a bow and now I'm ready to add my treat!

Once again, the "sky is the limit" here. You can put a treat bag inside the container or you can add pencils, pretzels ...what ever fits your needs. I added a simple treat bag and "Ta Da" I'm finished with my project . Because I made my gifts with only materials that I had on hand, my final cost was only $3.50 which was the price of the candy and it was on sale!

I hope that my tutorial was inspirational and if you are on a budget, a money saver as well.

Jan 15, 2010

New Stamps Preview


Well.... here is the first batch of new releases, shipping late next week.
There will be two more releases following these, so keep checking back.
CONTEST WINNERS
BERIT guessed the artists correctly, and our random winner was KATHI!!!
If both of you would email me at casdanben@aol.com and let me know which stamp you would like from the above selection, I will mail them as soon as they come in.
They are available HERE for preorder and will ship late next week.
Stamps Top from Left to Right are by
Sandra Hammer, ArTish, Tricia Moore
Tina Akonom, Lisa Schmidt, ArTish
Sentiments by Michelle

Jan 13, 2010

Challenge 7 Sketch


Random Winner of the Gift Voucher from  challenge #6 is Beadz
Please email me (Michelle) for your prize at casdanben@aol.com

Okay, we have the top three from Challenge 5 and  Challenge 6 to announce. You can click on the winners names to see all their beautiful work on their blogs.  Winners may copy the logo below to display on their blogs if they wish, and also are in the running for being a Guest Design Team Member.

Challenge 5
Challenge 6
1.Di


CHALLENGE 7


The next challenge is a sketch challenge!

Every other Wednesday we will host a challenge, and we want you to play! Prizes and fun and inspiration abound, and because you have a week and a half to get your entry in, there is plenty of time to find your creative magic... !
For our this challenge, we are asking you to...
use this sketch, kindly made by design team member Renata


You may combine this challenge with others- You can use any products or stamps (you aren't restricted to just using Pixie Cottage, although we would love to see how you use our products too!)- Post your creation on your blog with a direct link to the Pixie Cottage blog- Leave a comment with a link to your blog post with your entry (or use Mr. Linky if he is available)- Create a card, scrapbook page, altered box... no limit to your creativity!- Entries due by midnight (EST) on the January 24th- Winners will be announced on Wednesday, January 26th, along with the next challenge!And what will you win? I'm so glad you asked! :) One entry, drawn at random, will win a fabulous 10.00 gift voucher from Michelle's Scrapbooking & More.


Here are the wonderful cards made by our design team.


You may click on their names to be taken to their blogs to see more of their work.


Tammy (Sandra Hammer's new stamp April)


Michelle (this is Sandra Hammer's newest Hannah stamp..coming soon!!)

We are going to try Mr. Linky this week. This is my first time with him so if he does not work, just post a link in the comments.

Oh and I wanted to mention.... still no winner on the snippets of new stamps, so keep the guesses coming. If there are no right answers by this weekend, I will just draw two random winners.


Thanks so much for playing, Michelle

Jan 9, 2010

It's Tutorial Time!

Hi Everyone,
I'm Katie, member of the Design Team and I'm here with a little New Year Crafting Inspiration!
Hopefully with today being Saturday you'll get a little time to yourself for crafting.
A couple of weeks ago I made a card and I used a handmade rosette flower on it. I got some requests for directions and Michelle thought it may be good if I could give a quick tutorial.
I'm no good with editing videos and stuff so You Tube it isn't but I can take photos step by step.
So here it is, paper rosette flowers 101.


First you need to gather together your tools.
You will need:
A scoring mat such as a Scor Pal or the one by Martha Stewart
Bone folder or scoring tool
Cardstock or heavyweight printed paper
Paper cutter
Heavy duty double sided tape like ATG
Strong liquid glue, I use Beacon's 3 in 1 but Fabri-Tac is another great choice
1" circle punch used to punch two circles for each flower out of cardstock
Button


Cut a strip of cardstock/heavy dp into a strip 1" by 12"
Line the strip up into the top corner of your scoring board.


Using your scoring tool score lines at each 1/4" mark on the board.
Continue across the whole length of the strip.
A tip is to hold the cardstock firmly against the top of the board as it will move if you don't and if your score lines aren't level the flower won't work.


When you've scored the whole length take the strip off the board and start to fold along the score lines in an accordian fashion creating "hills and valleys" in the cardstock.


When the whole strip has been folded it should look like this.
I'm showing two sizes but our finished flower is using the strip that is 1" deep.
Larger depths are a little bit more tricky to work with and you have to add additional length to the strip by joining two pieces together or you can't "pinch" the flower into place (as you'll see in the next few steps)


Add a strip of ATG (or other strong tape runner style adhesive) to the first "V" at one end of your strip. Make sure both the "up" and "down" sdes of the V have glue on.


Join both ends of your strip into a circle overlapping one V on each end.
Squeeze the ends tightly to get the glue to adhere well.


Next begin to "pinch" the top edge of the circle together to make the center of the flower.
It sounds tricky but it really isn't. It will make a small cirlce in the middle of the flower and outer edge will fan out to make the flower.


Apply ATG liberally to one of the 1" cardstock circles. I've punched mine in a constrasting color to make it easier for you to see.
Have the circle glue side up on your desk and add the "pinched" flower to the top and press down firmly.
The folds in the cardstock make it very strong so you can press down very firmly without it crushing.


Squeeze some liquid glue in the center and around the inner edges and hold until it starts to set. You can also use a large glue dot pushed into the center to hold it together but I prefer glue.


Add another cardstock circle to the top.


I then inked the edges and and raised tops of the V's with chalk ink for definition.
I added a button to the top.


After completing the decoration of the flower I like to place something heavy on it while the glue completely dries and sets firm. This way I won't risk an unravelled flower.


Here you can see a finished flower on a card.

I hope I didn't make it seem complicated with so many steps, it really isn't hard at all, I just wanted to show every little step to make it easier to follow.
I'd love to see if you try one of these, they are so much fun and add something different to your cards.
Katie