It's time for another tutorial and this time Senior Design Team member Peggy from Beautiful Greetings and she's going to show us how enhance our cards by grabbing our trusty sewing machine.
 Sewing on cards is a great way to create a beautiful finished edge. I love using the zig zag stitch because it looks nice and is SUPER EASY to keep straight.
NEEDLE:
Your needle size doesn't matter, just remember that the larger the needle, the larger the hole it leaves. I use a size 11 which is a nice mid size needle. You can still see the holes but they don't overwhelm your stitching.
THREAD:
Another tip is to use your nice colored thread on the top and use a basic cheap thread for your bobbin. This will save you the expense of winding beautiful threads onto the bobbin when nobody will ever see them. When you do this, just make sure that the tension on the bottom is a little tighter than the top. This will pull the top thread down a little farther and you won't see the bottom thread at all. If you have tried to sew on paper and were frustrated with the little loops on the top, it is because your bottom tension is too loose. I use a Brother sewing machine and my tensions are: Top tension is 4 and the bottom is the default. If you keep getting loops, just adjust your top until they disappear.
PAPER:
You will need two pieces of paper but make sure that one piece, if not both are a heavy weight cardstock. Two thin pieces of paper do not stitch well. Cut the two pieces so that the smaller piece is 1/4" smaller than the other on all sides. For my demo, I used one 5" piece and one 4 3/4" piece.
GLUE:
You want to avoid your needle coming into contact with your adhesive. If you sew through your glue, it will not only gum up your needle but will eventually cause your thread to break where you don't need it to break (don't ask me how long it took to realize that!) I usually just make an "X" with my adhesive in the middle, avoiding all edges. This will keep your paper in place while you sew.
 Okay...on to the zig zag stitch.
For my demo today I have my stitch length set at 1.5 and my width at 3.5. You can experiment and see what you like best.
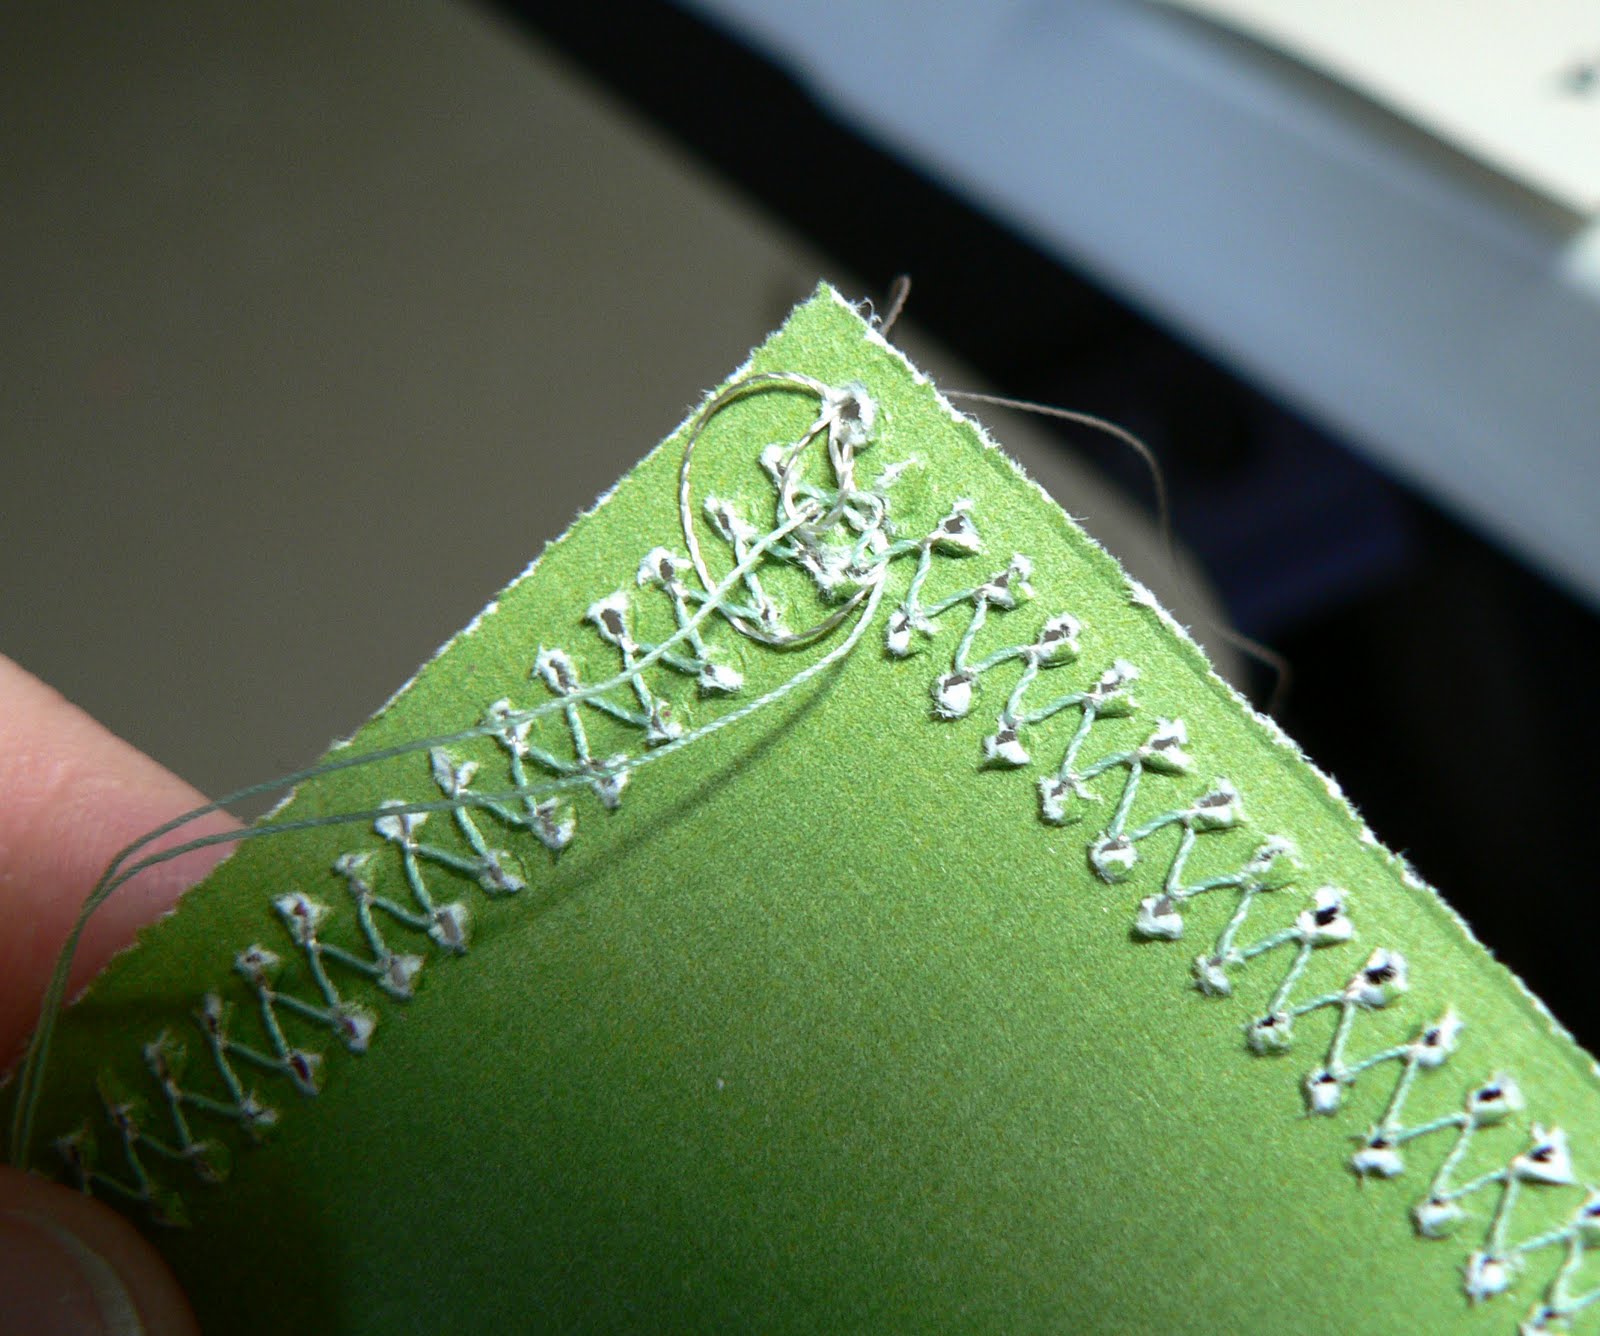
To begin, place your needle on the RIGHT side of the paper at the top corner. This will make the zig zag go inside your paper, also allowing you to use the edge of your smaller piece to keep the stitch straight. Start slow and make sure your needle always ends up on the right side of the edge.
 As you approach your corner slow your needle down and end with your needle on the RIGHT at the very bottom edge. If your needle doesn't naturally end up on the bottom right, just hand turn the dial and guide your needle while keeping your hand firmly on the paper. This will not allow the paper to advance while you place the needle where you want it.
 With your needle in the down position, lift the presser foot and rotate the paper to begin the new side. Your first one or two stitches will slightly overlap but this creates a clean finished corner. Finish the other two sides using the same method.
When finished with your last corner, leave the needle in the up position and gently pull your cardstock out and cut your threads. Leave a couple of inches of thread. To finish, gently pull the bobbin threads on the back until you can see your top thread come through, using a needle or the tip of your scissors, pull them all the way through to the back of the card.
I knot my thread by tying them all together but if you like, you can just tape them to the back of the card.
 To finish your card, just use your adhesive and glue all of the edges, over the thread and stick to your card base.
Voila! You have a beautifully stitched card!
Don't be afraid to play and try out new stitches on scrap paper. Sewing on cards can be a lot of fun!
 As you approach your corner slow your needle down and end with your needle on the RIGHT at the very bottom edge. If your needle doesn't naturally end up on the bottom right, just hand turn the dial and guide your needle while keeping your hand firmly on the paper. This will not allow the paper to advance while you place the needle where you want it.
 With your needle in the down position, lift the presser foot and rotate the paper to begin the new side. Your first one or two stitches will slightly overlap but this creates a clean finished corner. Finish the other two sides using the same method.
When finished with your last corner, leave the needle in the up position and gently pull your cardstock out and cut your threads. Leave a couple of inches of thread.
 To finish, gently pull the bobbin threads on the back until you can see your top thread come through, using a needle or the tip of your scissors, pull them all the way through to the back of the card.
I knot my thread by tying them all together but if you like, you can just tape them to the back of the card.
 To finish your card, just use your adhesive and glue all of the edges, over the thread and stick to your card base.
Voila! You have a beautifully stitched card!
Don't be afraid to play and try out new stitches on scrap paper. Sewing on cards can be a lot of fun!
I think Peggy did a fabulous job and I'd love you to show her some love :)
Katie


9 comments:
Thank you so much I will have to be brave and try again!
Hugs Ali x
Great tutorial filled with lots of much-needed advice and tips!! Thanks v much! Juliex
Wonderful tutorial! Well done Peggy.
Hugs
Tanya
oh brilliant tutorial hun so much needed all that advice hugs cheryl xxxx
Great Job on the tutorial Peggy!! I'm sure that it will be a great help!! :)
Great tutorial, thanks! I bought a machine but am running out of patience with it! This should help me!
Peggie, thanks for this. I have been wanting to sew on my cards and my first attempt was awful. I left the machine on the dining room table. Tried to get the tension right and still no good. I will try your tutorial, maybe this will work. I always enjoy looking at your cards. Your stitching is always great.
Peggy, you made this look soooo easy. Now, if I only had a sewing maching, I could try this. Love all of your stitching, it always looks soooo perfect!
Glad to see a tutorial on sewing...I brought mine out of the closet again. NOW, what about a straight stitch. I seem to do ok with the zig-zag, but trying to sew straight I'm struggling. I know practice, practice, practice, but now I've gone through a whole spool of thread. It's time to ask. Thanks for the help.
Sheila
Post a Comment