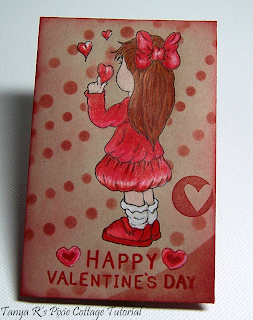
Valentine Pocket With Treat
Materials Used
Medium Size Kraft Envelope 5-3/4" x 4-3/8"
Additional Supplies Used
Prisma Premier Pencils
Tim Holtz Distress Ink
Ink Template
Eylets
Bakers Twine
Step One
Take your envelope and fold the two ends towards the center. Gently crease the edges. You can chose to measure your envelope for exact measurements, but I found it quicker to eyeball it.
Step Two
Take your bone folder or scoring tool and rub it over the folds. This gives the envelope a permanent crease.
Step Three
Open the envelope up and fold up the top flap of the envelope.
Step Four
Keeping the top flap open, fold the envelope back in so that the edges meet again.
Then bend the flap down, and go over it again with your bone folder/scoring tool.
Step Five
Take out your stamp and ink up the front of the envelope.
Step Six
Decorate your envelope as you wish. I chose to make mine a Valentine Pocket, adding a sweet treat as well. I packed it all in, used 3 eyelets in an interesting fashion, and sealed the back with some bakers twine.
The possibilities are endless, how you choose to decorate your pocket is totally up to you. I certainly hope that if you use this idea, you will come back and leave a link showing us your creative creation.
Happy Saturday, be sure to tune in on Saturday February 4th, 2012. Francy will be sure to treat you to another fabulous Pixie Cottage Saturday tutorial.


7 comments:
Oh my, thanks SO much for this tutorial! What an easy but stunning little treat holder. The instructions were perfect and so simple to understand.
Good idea,thank you very much!!!Happy weekend!
Now this is super clever - I can see doing this as a nice presentation for a gift card as well. Great idea!
Hi Tanya, this is a gorgeous project, thank you for the idea.
Francy
Oh, now this is so sweet!
Wow Tanya this is so FANTASTIC!!! Love the simplicity and ease in making this cute package/gift :)
Hugz
Awesome Tanya!! Love that little holder thanks for showing all the steps ;)
Post a Comment